How to Configure Cisco Switch | Easy Tutorial
This article is about How to Configure Cisco Switch, a complete guide for the configuration of Cisco Switch for a Beginner. For ease of understanding, we are diving this tutorial into the following basic steps:
- Access your Cisco Switch for Configurations
- Check the default or Current configurations on the Switch
- Set Host-name on Cisco Switch
- Configuring VLAN on Switch
- Assign an IP address to Cisco Switch
- Secure Your Switch with Basic Passwords
- Access and trunk port Configurations
Access your Cisco Switch for Configurations
To access your Cisco switch you may need a console cable. Power on your Cisco switch. Now make a console connection for Basic Cisco Switch Configuration. You need a console cable for this, you can understand the whole process with the following figure.
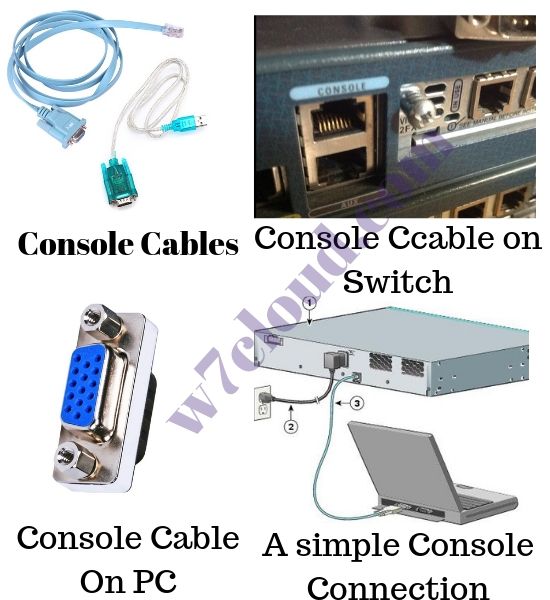
Using a console or rollover cable, you can connect the switch to your computer. Once you have the physical cable connection, you are required to a software to get the configuration interface on your PC. For this you can use a famous software known as Putty, you can download it free from the internet. Open the putty and you can try the following basic configurations for console connection to your Switch.

On successful connection you will see the initial command-prompt “Switch>”. Type the command “enable” & press the enter key to get into privileged_mode with the symbol (“Switch#”). This mode is known as privileged EXEC mode. You can learn more basic Cisco commands here.
Check the default or Current configurations on the Switch
For checking the default or current configuration on the switch you can use the command “show ruuning-configuration” in privileged EXEC mode. This command will show all configurations on the switch. With the running configurations, you can examine the different settings on switch like:
- The IOS version of the Cisco Switch
- Host-name of Cisco Switch
- IP configurations of different physical and virtual interfaces on the switch
- Routing protocols configurations
- Different switch password
- etc
If you are using a new Cisco Switch then you need to configure it on your own. In the next steps, you will learn the basic configurations of Cisco Switch.
Set Host-name on Cisco Switch
One of the basic settings initially you need to configure is to change the host name of your switch. You can use the following configurations for setting host name on Cisco Switch.
Switch>enable

Switch(config)#configure terminal

Switch(config)#hostname S1
S1(config)#exit
Configuring Vlan on Switch
With the VLAN you can reduce the size of the broadcast domain, and you can divide your network into different small network segments. Suppose you have two departments in your organization i.e. IT and HR, in such case you divide your network devices into two different network segments using VLANs. And in this scenario, you don’t need the additional physical switch. You can create the VLANs on your switch with the following commands:
Switch3(config)#vlan 10

Switch3(config-vlan)#exit
Switch3(config)#vlan 20
Switch3(config-vlan)#exit
The above command will create two vlans and you can assign IT department users to Vlan 10 and HR department users to VLan 20. 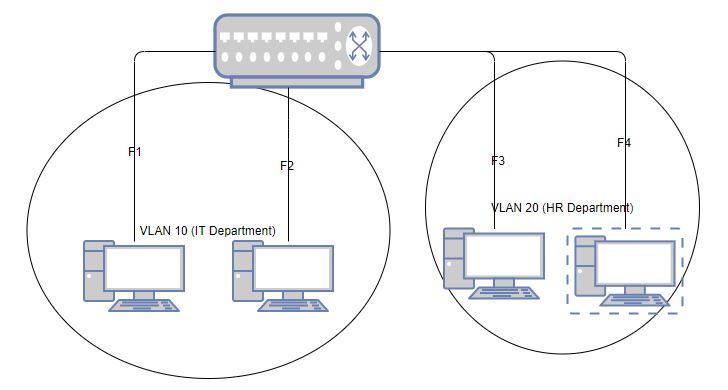 For assigning a port to VLan you can review the following commands:
s1(config) # interface  range fe 0 / 1 - 2

s1(config -if-range) # switchport mode access

s1(config -if-range) # switchport access vlan 10

s1(config -if-range) # exit
s 1(config) # interface range fe 0 / 3 – 4
s 1 (config -if-range) # switchport mode access
s1(config- if-range) # switchport access vlan 20
s 1(config- if-range) # exit
With the above configuration port 1 and 2 are assigned a VLAN 10 (IT department) & interfaces f3 and f4 are assigned to VLAN 20 (HR). You can learn more about inter-vlan routing from Here.
Assign IP address to Cisco Switch
You can assign an IP address on the Cisco switch if your switch has the layer-3 capability. If you don’t have a layer-3 switch then you can even assign an IP address to VLAN interface for management purposes. To assign an IP address to Cisco Switch you need to access the respective interface and then use the following commands:
Sw2(config)#interface vlan 10

Sw2 (config -if) #ip address 172.111.1.11 255.255.255.0

Sw2(config -if) # no shutdown
For assigning an IP address to physical interface on Cisco switch you can user the same commands:
Sw2(config)#interface f0/1

Sw2 (config -if) #ip address 192.167.1.11 255.255.255.0

Sw2(config -if) # no shutdown
Secure Your Switch with Basic Passwords
You can set a different password on the Cisco switch in order to make it secure. For setting the login password or enabling password to cisco switch. You can use the following commands on Cisco Switch:
Sw1#configure t

Sw1(config) # line console 0

Sw1(config - line) # password CISCO

Sw1(config-line)#login
For remote access or telnet access you can configure the password in the following way:
Sw1(config-line)#line vty 0 15

Sw1(config-line)#password cisco

Sw1(config-line)#login

Sw1(config-line)#exit
Access and trunk port Configurations
There are different types of ports that you can configure on your Cisco Switch like Access port and trunk port. The access port can carry the traffic of a single VLAN only. An access port can be used to connect a PC or IP phone with your Cisco switch. A trunk port can carry the traffic for multiple VLANs, Normally these ports are used for connecting two switches with each other. Following are basic configuration examples of access and trunk ports:
For Trunk configurations, you can use the following commands:
Sw1(config)# interface f 0/1
Sw1(config-if)# switchport mode trunk
Sw1(config-if)# switchport trunk native vlan 10
For access port configurations you can review the following Cisco configurations:
Sw1(config)# interface f0/1
Sw1(config-if)# switchport mode access Sw1(config-if)# end
For more details on switch networks, you can visit How to design switch network.
Tutorial on Cisco Router Configuration CCNA
I hope this is informative for you, i tried to share the very basic information regarding the Cisco switch configuration in this article. I tried to cover the maximum content of the topic. If you believe that some info is still part of this article then please share your views in the comments for further addition. Thank you for visiting and reading this…!
Most Asked BGP Interview Questions