If you’ve recently upgraded your printer or no longer need a particular one, it’s essential to remove it from your Mac to keep your printing options organized and clutter-free. Removing a printer from your Mac is a straightforward process, and this article will guide you through it step by step.
Why we need to Remove the Printer from MAC
If you no longer need a printer for your Mac, maybe because you got a new one, it’s a good idea to remove the old one to prevent potential issues later on. If you don’t do this, you might forget to update the special software, and that could create problems with other printers in the future.
How to Uninstall a Printer on MAC
If you ever replace your printer with a new one, you should also uninstall the old printer and its special software. I’ll show you how to do this in this guide.
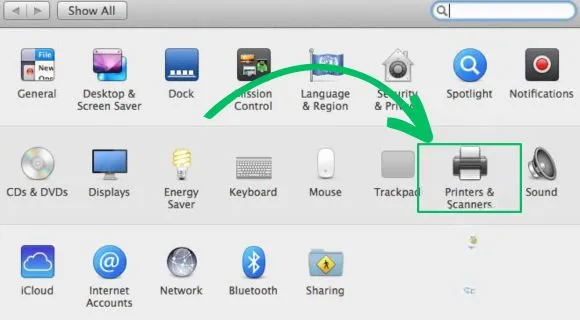
Step 1: Open System Preferences
The first step to delete a printer from your MacBook is to open the System Preferences. You can easily do this by following these straightforward steps:
Click on the Apple logo in the upper-left corner of your screen. This action will open a menu with Apple-related options. From that menu, choose “System Preferences.” Alternatively, you can also find “System Preferences” in your Dock or by using Spotlight search (Command + Spacebar).
Step 2: Access Printers and Scanners
Once you’ve opened System Preferences, you’ll see a window with various system settings. Look for the “Printers & Scanners” icon and click on it. This will take you to the Printers & Scanners preferences pane, where you can manage your printers.
Step 3: Select the Printer to Delete
In the Printers & Scanners preferences pane, you’ll see a list of all the printers and scanners connected to your Mac. Find the printer from the list that you want to uninstall from the MAC and just select it. When you click on the printer’s name, it should become highlighted.
Step 4: Remove the Printer
With the printer selected, you’ll notice a toolbar at the bottom of the printer list. In this toolbar, you’ll find several buttons, including a plus (+) and a minus (-) button. To delete the selected printer, click on the minus (-) button.
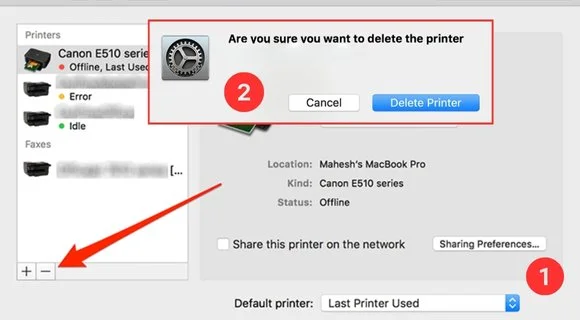
Step 5: Confirm Deletion
After clicking the minus (-) button, a confirmation dialog will appear, asking if you’re sure you want to delete the printer.
This step is really important because it stops you from accidentally removing something.
If you’re certain that you want to remove the printer, click the “Delete Printer” button in the confirmation dialog.
Step 6: Complete the Removal
Once you confirm the deletion, the selected printer will be removed from your Mac. It will no longer appear in your list of available printers and scanners. You have now successfully uninstalled the printer from your MacBook.
Additional Tips:
Removing Multiple Printers:
If you have multiple printers you want to remove, you can repeat the process for each one by selecting them individually and clicking the minus (-) button.
How to add new Printers On MAC:
If you ever need to add a printer back to your Mac, you can easily do so by clicking the plus (+) button in the Printers & Scanners preferences pane. Your Mac will search for available printers on your network and guide you through the setup process.
Troubleshooting:
If you encounter any issues while trying to delete a printer, ensure that your Mac is connected to the printer and that it’s turned on. Sometimes, a printer may not appear for removal if it’s offline or not recognized by your Mac.
Final Words
By following these steps, you can efficiently uninstall a printer from your Mac, keeping your printing options organized and ensuring that only the printers you need are listed in your preferences. Keep in mind that if you ever need to use a printer again in the future, you can easily put it back on your Mac.