Route Based Site To Site IPSec VPN on Juniper:
In this article I will show you how to configure route based site to site IPSec VPN on Juniper SRX series router. In our topology we have two SRX juniper routers and both devices have the interface ge-0/0/3.0 which are connected to internet. This interface is configured with the IP address 1.1.1.1/30 on SRX-A and 2.2.2.2/30 on SRX-B. Both router are connected with their LAN network i.e. 10.1.1.0/24 on SRX-A and 10.2.2.0/24 on SRX-B.

Lab Objectives:
Currently, SRX-A & SRX-B provides internet access to LAN networks, both LANs are required to communicate security via internet.
Our task is to make communication between host-A and Host-B over via internet. For this we need to configure a VPN between them. We will configure a secure tunnel using Route-based IPSec VPN which allows for separation of VPN configuration and security policy configuration. For configuring Route based VPN we are required to configure the following:
- Configure internet key exchange (IKE) protocol to set up a dynamic tunnel between SRX devices.
- IKE works in 2 phases
- Phase-1 Secure Channel for communication between device
- particular VPN tunnel for user’s traffic
- For Route Based VPN you need to configure tunnel interface st0.x, where x is a number and bind VPN to that interface. Any traffic that is routed to st0.x will go to the tunnel, if security policy permits it.
- Configure security policy on both routers
Configuration of IKE on Site A:
We configure tunnel interface that is st0.x in our case, we put this interface into VPN zone. Also we need to define the security policies here. IPsec packets go out of ge-0/0/3 in zone untrusted and no policy is needed between VPM and untrust zones. However you need to enable host-inbound-traffic for IKE.
In first step of configuration you are required to define the IKE keys their life-time, encryption type and algo type.
set security ike proposal IKE-PROP lifetime-seconds 3600
set security ike proposal IKE-PROP authentication-method pre-shared-keys
set security ike proposal IKE-PROP authentication-algorithm shal
set security ike proposal IKE-PROP encryption-algorithm aes-128-cbc
set security ike proposal IKE-PROP dh-group group5
2nd step is configuring IKE policy and their mode. and then enter the pre shared keys
set security ike policy IKE-POL proposal IKE-PROP
set security ike policy IKE-POL mode main
set security ike policy IKE-POL pre-shared-key ascii-test juniper
Now configure the remote host setting and IPs on SRX-A.
set security ike gateway IKE-GW ike-policy IKE-POL
set security ike gateway IKE-GW address 2.2.2.2
set security ike gateway IKE-GW external-interface ge-0/0/3.0
Set security zones security-zone untrust host-inbounf-traffic system-services ike
Configuration of IKE on Site B:
Same configurations are required on the router SRX-B with little changes of IPs.
set security ike proposal IKE-PROP lifetime-seconds 3600
set security ike proposal IKE-PROP authentication-method pre-shared-keys
set security ike proposal IKE-PROP authentication-algorithm shal
set security ike proposal IKE-PROP encryption-algorithm aes-128-cbc
set security ike proposal IKE-PROP dh-group group5
2nd step is configuring IKE policy and their mode. and then enter the pre shared keys
set security ike policy IKE-POL proposal IKE-PROP
set security ike policy IKE-POL mode main
set security ike policy IKE-POL pre-shared-key ascii-test juniper
Now configure the remote host setting and IPs on SRX-A.
set security ike gateway IKE-GW ike-policy IKE-POL
set security ike gateway IKE-GW address 1.1.1.1
set security ike gateway IKE-GW external-interface ge-0/0/3.0
Set security zones security-zone untrust host-inbounf-traffic system-services ike
Phase-2 Configuring IKE (configure both router with same configuration)
set security ipsec proposal IPSEC-PROP lifetime-seconds 3600
set security ipsec proposal IPSEC-PROP protocol esp
set security ipsec proposal IPSEC-PROP authenication-algorithm hmac-shal-96
set security ipsec proposal IPSEC-PROP encryption-algorithm ae-128-cbc
set security ipsec policy IPSEC-POL proposals IPSEC-PROP
set security ipsec policy IPSEC-POL perfect-forward-secrecy keys group5
set security ipsec vpn IPSEC-VPN ike gatewat IKE-GW
set security ipsec vpn IPSEC-VPN ike ipsec-policy IPSEC-POL
set security ipsec vpn IPSEC-VPN vpn-monitor
set security ipsec vpn IPSEC-VPN establish-tunnels immediately
set security ipsec vpn vpn IPSEC-VPN bind-interface st0.1
Configuring Tunnel interfaces:
Now we need to configure our tunnel interfaces, for this we will create st0 interface with family inet and place this into VPN security zone. For this you are required the following commands on both routers i.e. on SRX-A & SRX-B.
set interfaces st0 unit 1 family inet
set security zones security-zone VPN interface st0.1
Now we need to configure the static routes on both routers. on SRX-A we create a static route for 10.2.2.0/24 & on SRX-B we tell them that network 10.1.1.0/24 is behind the interface st0.1.
SRX-A
set routing-options static route 10.2.2 /24 next-hop st0.1
SRX-B
set routing-options static route 10.1.1/24 next-hop st0.1
Configuring the security policy
For the final step we need to configure the security policy, we will configure the security policy between trust zone to VPN zone. For simplicity we are allowing all hosts from A to B and vice versa. For this we are configuring address book on both devices.
Address Book (Both Routers)
set security adder-book global address network-A 10.1.1.0/24
set security adder-book global address network-B 10.2.2.0/24
Security policy on SRX-A
set security policies from-zone trust to-zone VPN policy Trust-to-VPN match
source-address network-A destination-address network-B application any
set security policies from-zone trust to-zone VPN policy Trust-to-VPN then permit
set security policy from-zone VPN to-zone trust policy VPN-to-trust match
source-address network-B destination-address network-A application any
set security policies from-zone VPN to-zone Trust policy VPN-to-Trust then permit
Security policy on SRX-B
set security policies from-zone trust to-zone VPN policy Trust-to-VPN match
source-address network-B destination-address network-A application any
set security policies from-zone trust to-zone VPN policy Trust-to-VPN then permit
set security policy from-zone VPN to-zone trust policy VPN-to-trust match
source-address network-A destination-address network-B application any
set security policies from-zone VPN to-zone Trust policy VPN-to-Trust then permit
How to verify VPN configurations:
Following are useful commands for verifying VPN:
- show security ike security-associations
- show route
- show security ipsec statistics
Output of show security ipsec security-associations
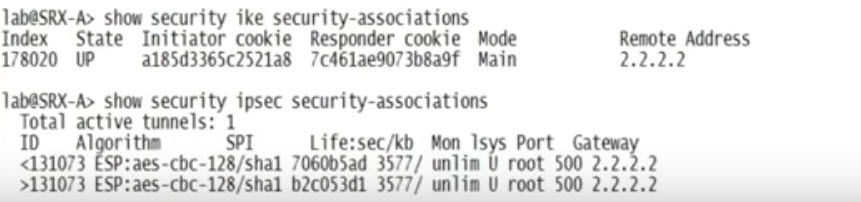
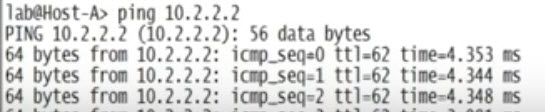
Ping from host-A to host-B will be successful.
Learn about “what is a vpn client“