How To Convert HP Printer To Sublimation Printer
Do you have an old workhorse of a printer? Do you want to convert it into a sublimation printer so that you can print t-shirts, fabric, paper, and more with it? Well then this article is for you! We will walk through how to convert your HP printer into a sublimation printer. This is not as difficult as it may sound at first glance. It just takes some time and patience.
What are Sublimation Printers?
Sublimation printers are a special type of inkjet printer that allows you to print on different types of surfaces such as fabric, paper, and even ceramics. In the sublimation process, the image is printed onto a transfer sheet. After that heat and pressure are applied to the sheet. Which causes it to release the dye from the solid state directly into gas form. This process results in a high-quality, permanent print that will not peel or fade over time.
What type of Printer you can use for Sublimation?
Normally, Inkjet printers are used for sublimation. The sublimation ink is used in these printers to transfer the image onto the substrate. Earlier, only a few types of printers could be used for this purpose but now with the evolution in technology. Now a day almost all inkjet printers can be used for sublimation printing.
How the Sublimation Process Works:
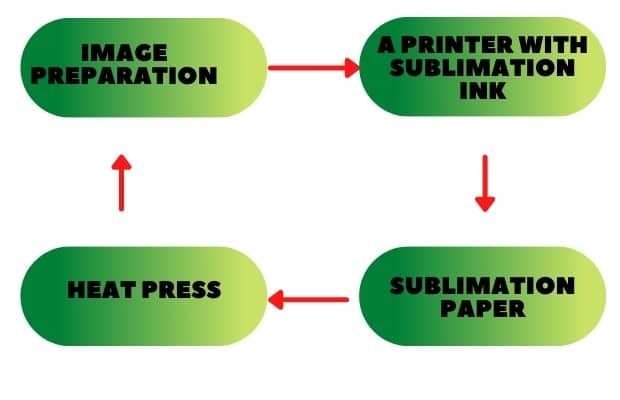
Before starting the process of converting your HP printer into a sublimation printing press. It is important that you understand how the sublimation process works. We will demonstrate how SubliJet-HD transfers an image onto heat-activated materials like fabric and paper substrates using four steps:
- The first step is called “image preparation” in which the original design is scanned into the computer. And then edited as per design requirements.
- The second step is “Screen Artwork Creation” in which screen artwork is created on a translucent film using an inkjet printer, or other devices like pinstriping guns. The reason why this step was added after image preparation is that you can use any type of color combination for your artwork creation process. But when it comes to actually print onto substrates only CMYK (Cyan Magenta Yellow Black) colors are used. Because these are opaque in nature. So by creating the artwork with all possible combinations one could get a final print output with transparent background items (if required).
- The third step is “Printing the Film positives”. This step the prepared screen artwork is printed onto film positives using an inkjet printer. This will give us a positive image of our artwork that we will be using for the next step.
- The fourth and final step is called “Sublimating the Image” in which the fabric or paper substrate is placed on top of the SubliJet-HD plate. And then heat and pressure are applied using a heat press. This causes the dye particles within the sublimation ink to break free from their carrier molecules. And bond with the polyester fibers in the fabric or paper. The heat and pressure also activate the adhesive properties of the ink which enables it to transfer from the fabric or paper substrate onto a t-shirt, mouse pad, mug, etc.
How to convert hp printer to sublimation printer
This is a comprehensive list of items you will need to convert your HP printer into an effective sublimation device. To convert an HP printer, you will need the following items:
- A printer with Sublimation ink
- Sublimation paper
- Heat Press
A printer with Sublimation ink
If you want to convert your old HP printer into a sublimation model, be sure that it has never been used before. Otherwise, there’s a chance of mixing between ordinary ink and converted colors which would result in no benefits at all. When printing or etching, make certain that both the ink color and paper are compatible. You need quality products for your desired outcome because anything less could result in problems during these steps.
It is the next stage to empty the ink tanks, and then fill the tanks with ink that is sublimated. This is a process that can be challenging for users of HP printers. There is no means to find compatible cartridges and refills. If you discover that you are not able to find compatible cartridges that contain sublimation inks for HP printers that utilize cartridges with ink. It is clear that there is no way to transform them into sublimation printers. It is simple to take them off and refill tanks of ink.
Select Your Design and Print it on Sublimation paper
When you’ve identified the ideal image to print. It is now the time to modify its proportions to be in line with what we would like our final product to look like. This can include portraits as well as views of the landscape dependent on how large or small the person wants their own personalized clothing.
To print an image, you’ll require a Sublimation paper. Insert the paper into the printer and print out the desired print on the Sublimation paper.
If you’re transferring the image onto cloth or other material when the image is printed out from your printer. Take a close examine it to ensure there aren’t gaps or lines between. If you notice any, you should throw away the page and print a new one until they’re gone!
But if you find that everything is okay, then press the shirt to heat prior to washing to ensure that the flaws are highlighted. However, if what appears to be some lightness is to be normal upon closer examination. It’s okay because sublimation ink is more visible when it is heated on fabric using the use of a heat press.
Heat Press
The last step in making your personalized t-shirt is to apply heat to it. This is why you should take the printed paper and place it into the shirt to allow you to iron directly on top of the area you’d like your images printed. without worrying about whether they’ll stick to the bottom of the shirt because we’ve already put adhesive on earlier.
Start by pressing right through the first turn around one page to the ends, then tap them at the joints, making sure not to leave any gaps between the pages. As there is no requirement for air circulation while melting these kinds of design materials and also giving them greater surface contact points Now, use both hands for holding.
The tough part is over. You can now relax and enjoy your DIY shirt and other different stuff. Make sure to remove the paper with care. So that you do not damage the fibers prior to applying another layer when needed.
Conclusion :
I hope these steps are informative for you and will help you a lot. We can walk you through all of the necessary steps from start to finish. And if we don’t have an answer right away, We’re happy to help! I hope these steps helped you understand how easy it is to convert an HP printer into a sublimation printer. If not, please feel free to comment anytime with any questions or concerns you may have.